
We recently introduced Adaptive Cards as a key structure in Tikit templates and custom forms. They are easy to work with, plus they help administrators, analysts and end-user stakeholders get greater value from Tikit. Let’s dig into how to set up, use and serve custom forms to end users in the most optimal way, so that you have a strong foundation for upcoming innovations and automation.
Templates and custom forms help you collect and transfer data seamlessly—and empower your virtual agent work on your behalf. The magic starts in the custom form builder.
Anatomy of the Custom Form Builder
You’ve seen the builder if you’ve either built a template from scratch or used an out-of-box version. You might not have altered the out-of-box form, so we’re going to walk through the landscape now.
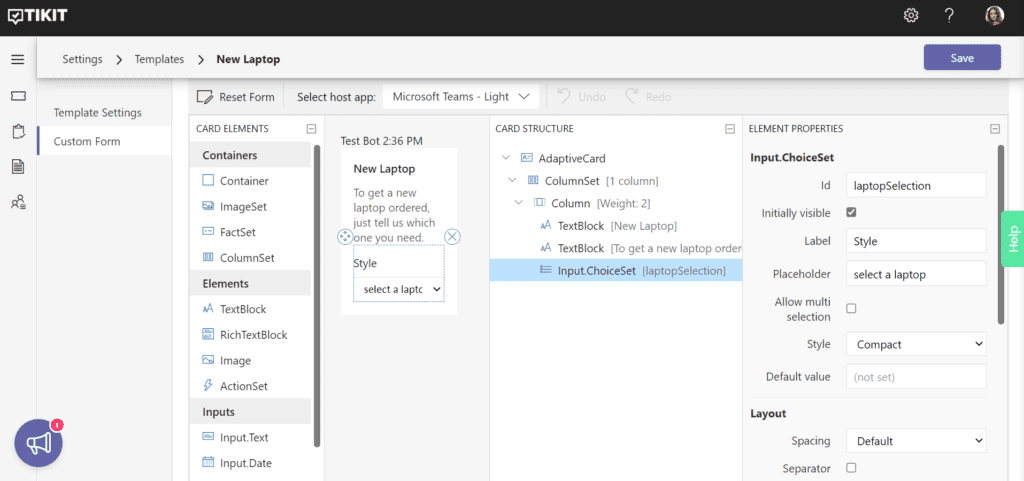
The custom form builder contains four major columns in the view: Card Elements on the left with Test Bot in the middle left, Card Structure in the middle right and Element Properties on the far right.
Card Elements and Test Bot: Everything You Need to Design the Form
Creating the form look and feel starts with design, and you have a lot of options in the builder. You’ll find them in Card Elements on the left of your custom form view:
- Elements: this is the substance of your content, with text, rich text, images and actions that mimic Microsoft Word formatting.
- Inputs: these are the controls that allow users to enter information into your virtual agent in Microsoft Teams—and the method of seeing data you can track on the backend.
What will your form look like? You can experiment, review the form in the “test bot” column and make edits as needed.
Card Structure: Your Reference for Logic
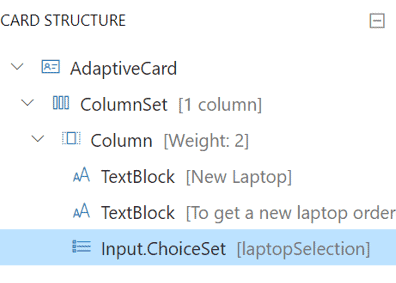
Card Structure helps you see the structure of a custom form, meaning the logic (what is visible on the form and the rules for processing input data). In the image, you can see the order and flow of elements as they are grouped together on the form.
There are a number of ways you can build the card, but we highly recommend adding elements to one column and grouping at the parent level. It’s much easier to uniquely name and identify elements this way. And it’s easier to manage, since your repository of cards builds over time.
Element Properties: Element Details and Ammo for Tracking
You can see detail about the task an element performs in Element Properties. In fact, as you click each element in the Card Structure, the property column will change to reflect property information. Some elements, like Text Block, are self-explanatory—the text that you have added to the form, typically questions for the users about their request, will show up in the Element Property column.
Apply a Unique ID to Each Element
The ID field is the internal name, a behind the scenes descriptor, that you give to an element. It acts as a secret weapon—it only appears when you configure the form and fill in the field, and it’s not visible to end users or analysts working tickets.
As long as you set a unique ID for an element, you can pluck that element data out quickly when you need to reference it. More to come on how you might use unique IDs in the future.
As you work with templates and custom forms, you will gather a substantial number of elements. It may not seem vital now, but the ability to grab a unique element based on an internal name will come in handy. And when it comes to future process simplification, applying an ID is downright essential.
Input Choice Set
The great thing about working with templates and custom forms is that you can serve pre-determined questions and gather information immediately when an end user submits a request. The way those options appear on the form is managed by the Input Choice Set fields in Properties.
You’re basically offering users a choice of options. If they are requesting a new laptop, you may ask end users to choose which kind of laptop they need:
- Low-end
- Midrange
- High-end
These choices are viewable on the front end. But on the backend (in the custom form view), you can see that the Input Choice Set consists of two columns. The choices on the left column are called titles—this is what the end user sees. The fields on the right are the values associated with each title, or unique identifiers.
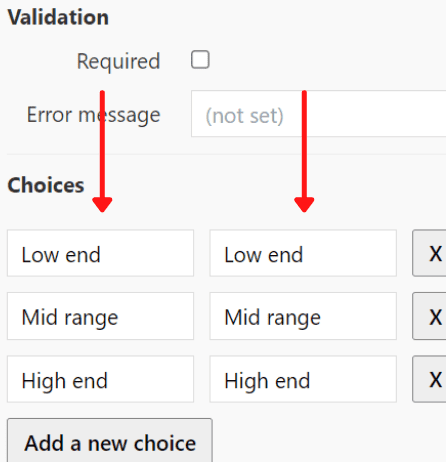
Apply a Meaningful Name to a Value
Out-of-box forms don’t contain unique values, so we recommend applying a meaningful name. In this example, it could be a series of laptop models.
| Low-end | Laptop model x (the low-end option) |
| Midrange | Laptop model y (the midrange option) |
| High-end | Laptop model z (the high-end option) |
We are assigning a value (possibly a different name) to the choice on the backend, because this will give admins and analysts the ability to track items (and eventually automate processes). In our example above, users may not know or care what model the laptop they need, they just know they need a mid-range laptop. Because the choice has an assigned value, though, analysts knew exactly what model of laptop they need to procure.
The practice of using titles and values improves the experience for all parties. Admins and analysts, however, can continue to refine their process by changing values associated titles. More to come about why this practice offers a lot of possibilities and improved workflow.
Following these guidelines will give you greater ease working with templates and custom forms but hang onto your hat: by internalizing these best practices, you will be already set up to take advantage of process improvements coming in the near future! Stay tuned.
We’ll be covering additional IT service management best practices, like ticket categorization, that are executed in innovative ways in Tikit. This guide further breaks down Tikit’s functionality, backstory and the value of building a service desk in Teams: How Microsoft Teams Inspired Our Microsoft Teams Service Desk Solution. You can see how Tikit works in this demo. Or better yet, explore Tikit in a free 14-day fully-functional trial with no credit card needed!